A few days ago, I posted on Mastodon about my excitement for the new Projects plugin for Obsidian by Marcus Olsson and the great possibilities it offers for keeping a reading list, for example. Some have asked if I can write up how I accomplished that. I will gladly do so.
The combination of Zotero (with the Better BibTeX plugin) and Obsidian with the Citation and Projects plugins are the perfect way for me as a PhD student to keep track of the literature to be read and already read. I had first started keeping a manual reading list, already using the Literature Notes that the Citation plugin generates. Then I tried using a Kanban list to schedule and track my reading activities. Neither of these worked well. But the Project plugin now helps me accomplish exactly what I currently need to do with my literature: prioritize, filter, plan and track, evaluate, check off. As I progress with my research project, I could imagine adding more tags or keywords by topic, while hiding or removing others. The possibilities seem endless.
If you already use Zotero with Better BibTeX and the Citations plugin in Obsidian, you can jump directly to step 5. Then, the setup is very simple and it doesn’t really need much guidance, because the only thing you need to pay attention to is that your automatically generated Literature Notes have a valid frontmatter/YAML (step 3).
Main steps
- Installation and setup of the Better BibTex plugin in Zotero
- Export your Zotero library
- Installation and setup of the Citations plugin in Obsidian
- Creating the first Literature Notes with the help of the Citations Plugin in Obsidian
- Installation and setup of the Projects plugin
- Customization of the Projects plugin
Preliminary requirements
- Installation of Zotero
- Installation of Obsidian
Step 1: Installation and Setup of the Better BibTex plugin in Zotero
The goal of this step is to get Zotero and Obsidian to communicate with each other and generate cite keys.
Download: https://retorque.re/zotero-better-bibtex/installation/
Setup: https://www.marianamontes.me/post/obsidian-and-zotero/
In the Zotero settings under the tab Better BibTeX you can adjust how the citation key should look like. It is best to choose a key that is easy to remember. I decided to use the following formula, which results in cite keys such as „Abid.2017“ or „AbidEtAl.2017“:
authors(n=1,etal=EtAl)+"."+year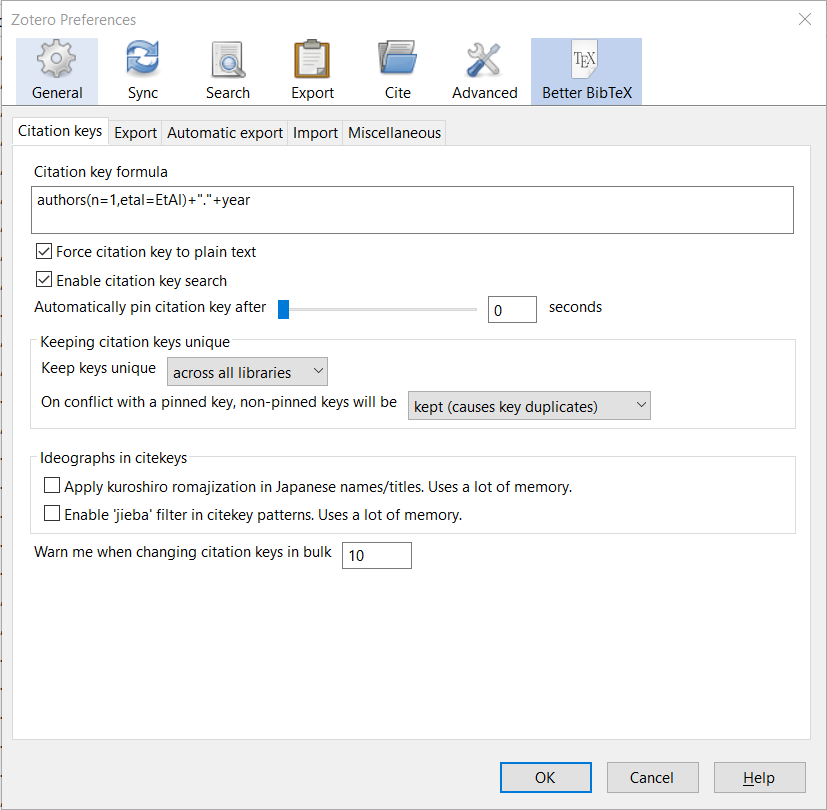
So every entry in my library now has a citation key, which I will need for further work in Obsidian. You can use these keys whenever you cite something from your Zotero library. With the right settings, they can be automatically converted into active citations. But that’s another topic.

Step 2: Export your Zotero library
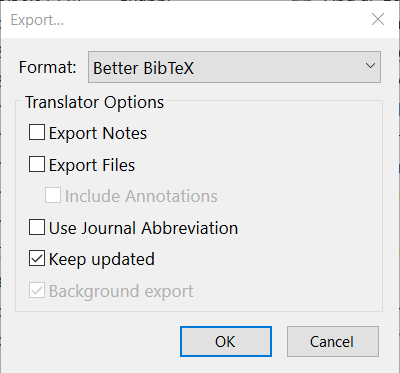
Export your Zotero library in Better BibTex format (File > Export Library) and be sure to select „Keep updated“. Whenever you make a change, your library will automatically be re-exported and the .bib file will always be up to date. Remember the location, we need it in the next step.
Step 3: Installation and setup of the Citations plugin in Obsidian
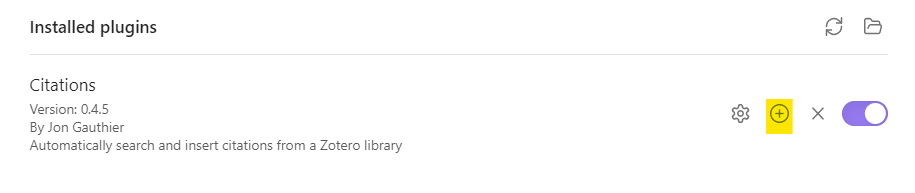
Installation and activation of the Citation Plugin by Jon Gauthier under Community Plugins: https://github.com/hans/obsidian-citation-plugin
Once you have installed and enabled the plugin, go to the settings and:
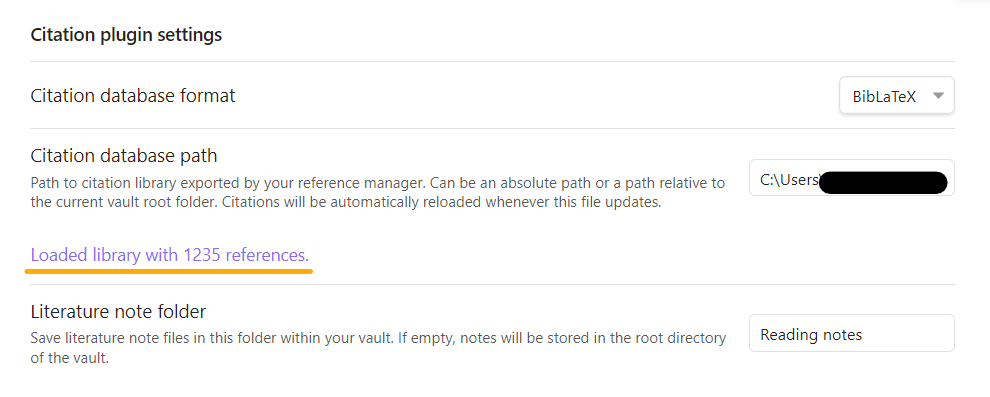
a) Under Citation database format, select „BibLaTex“,
b) Under Citation database path, enter the path to the Zotero library you just exported,
c) Set up a folder where you want to store your Literature Notes, which are automatically created notes with the bibliographic references of all your titles in Zotero. Make sure to actually create the new folder and to insert the path here.
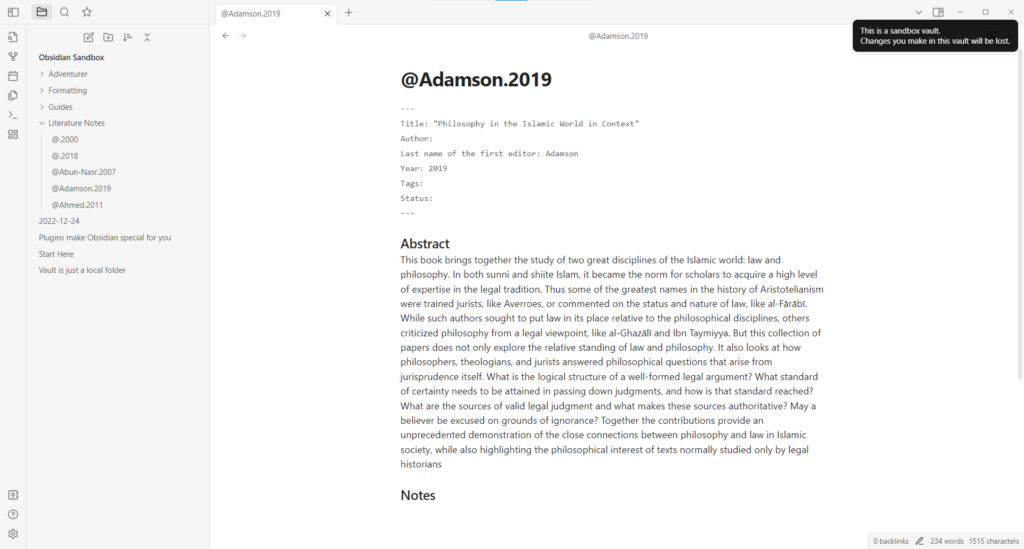
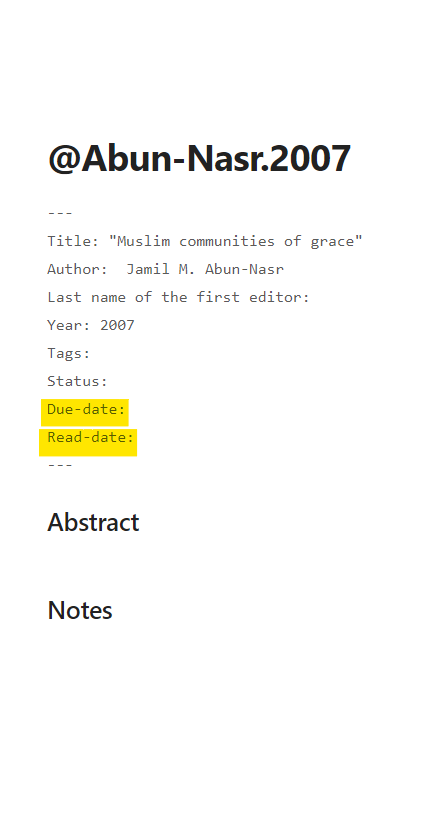
Now you should adjust the template for your Literature Notes, also under the settings of the Citation Plugin. I have currently chosen the following settings:
Here for copying:
---
Title: "{{title}}"
Author:  {{authorString}}
Last name of the first editor: {{entry.data.creators.editor.[0].lastName}}
Year: {{year}}
Tags:
Status:
---

### Abstract
{{abstract}}

### Notes
{{note}}
Step 4: Creating your First Literature Notes with the Help of the Citations Plugin in Obsidian
Now it is necessary to create Literature Notes for the titles you want to include in your reading list. The easiest way to do this is to use the hotkeys of the Citations plugin. These hotkeys can be set – as with all other plugins – via the plus in the Installed Plugins view.
I have chosen the following hotkeys:
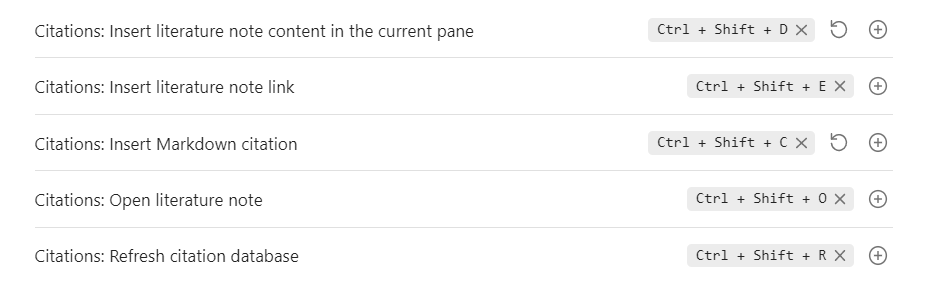
The command „Open Literature Note“ automatically creates a note in the folder „Literature Notes“ that contains the bibliographic information from Zotero. So now if you click Ctrl+Shift+O, a new window will open where you can select any title you want from the Zotero library.
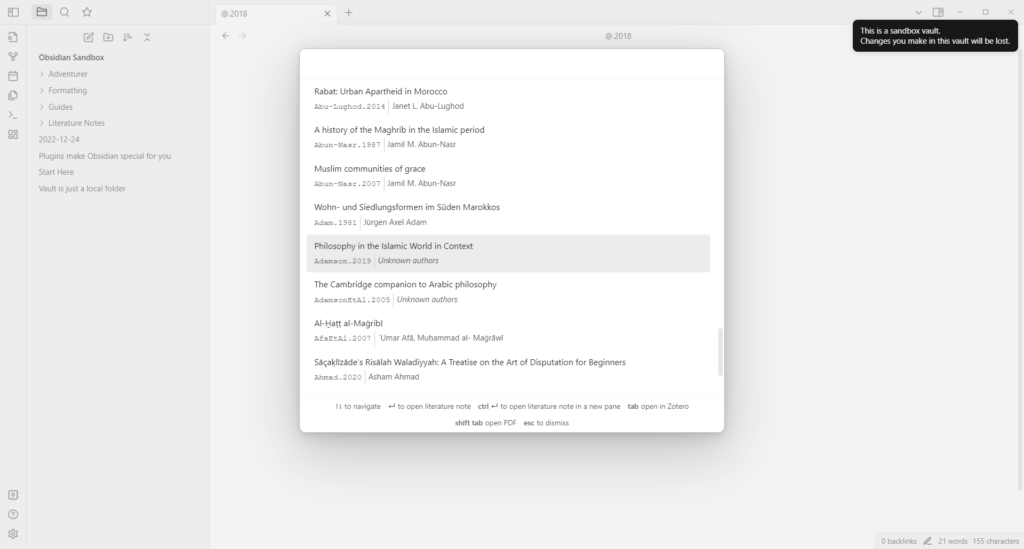
If you need other information displayed in your Literature Note (and respectively in your Reading list), you might want to modify the Literature Note template (step 3).
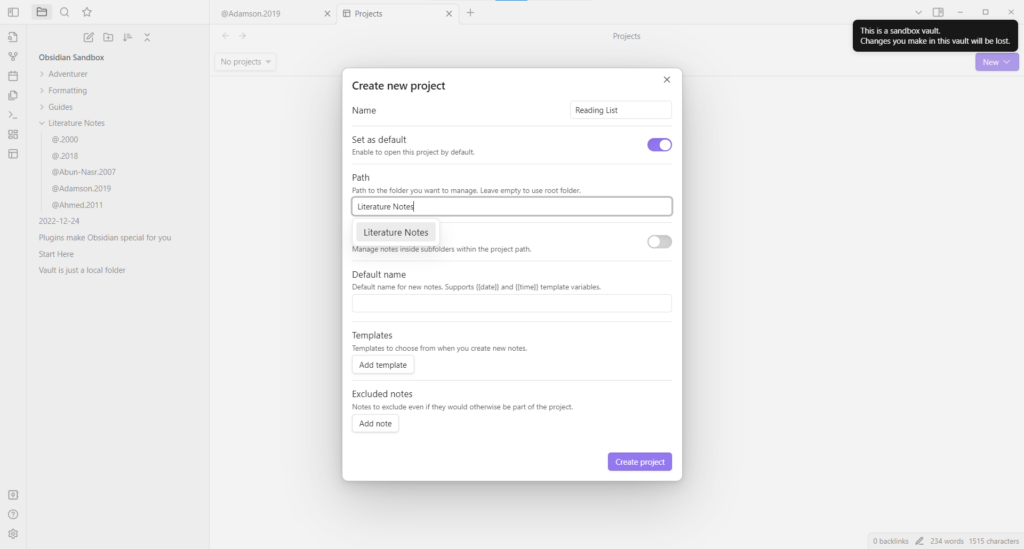
Step 5: Installation and setup of the Projects plugin
Installation and activation of the Projects plugin by Marcus Olsson under Community Plugins: https://github.com/marcusolsson/obsidian-projects
After you have installed and enabled the plugin, create a new project, for example with the title „Reading list“. If you want, select „Set as default“ to always open this project first. Then select the location of your „Literature Notes“ under path – in the example it is „Literature Notes“.
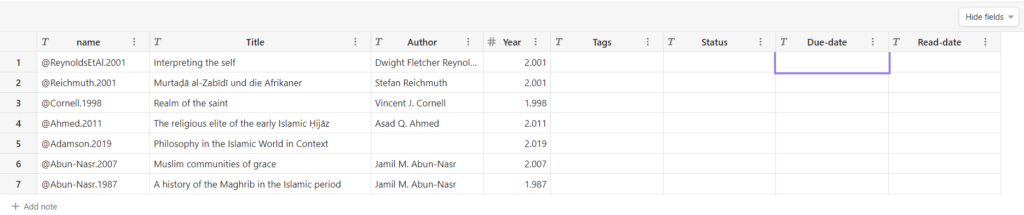
Now you have a list of all the titles you generated under Literature Notes – with all the details you saved from Zotero in the frontmatter.
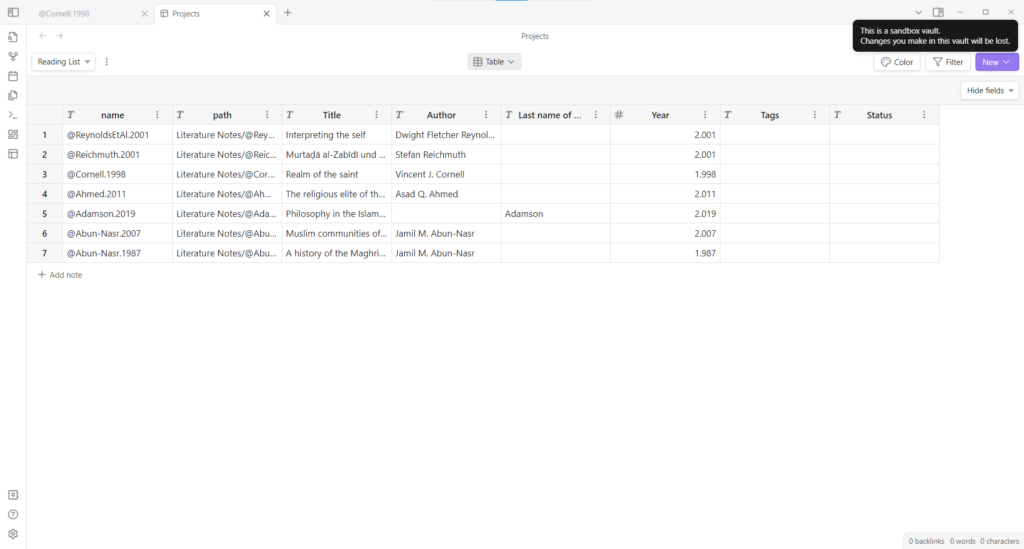
First of all, we can adjust the view a bit, hide some columns and adjust the size. We can also add additional columns. We do this by opening an entry by clicking on the number of the entry and adding a new component in the frontmatter, here in the example „due-date“ and „read-date“; I also added „priority“. These categories appear with all other entries as soon as they are filled in.
I will now fill in these new categories, for example, with my established tags, the priority I assign to a text, and the dates until when I plan to read the literature.
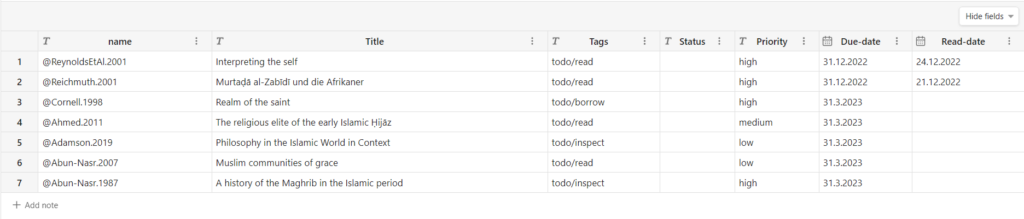
I can now regularly review and update this list. To do this, I no longer have to open each individual entry, but I can make the changes directly in the list view of Projects. The changes are then automatically made in the frontmatter, which you can also utilize elsewhere, for example with the Dataview plugin.
Step 6: Customization of the Projects plugin
The Projects plugin has just been released, it will surely be refined in the future. The current developments can be found here: https://github.com/users/marcusolsson/projects/4
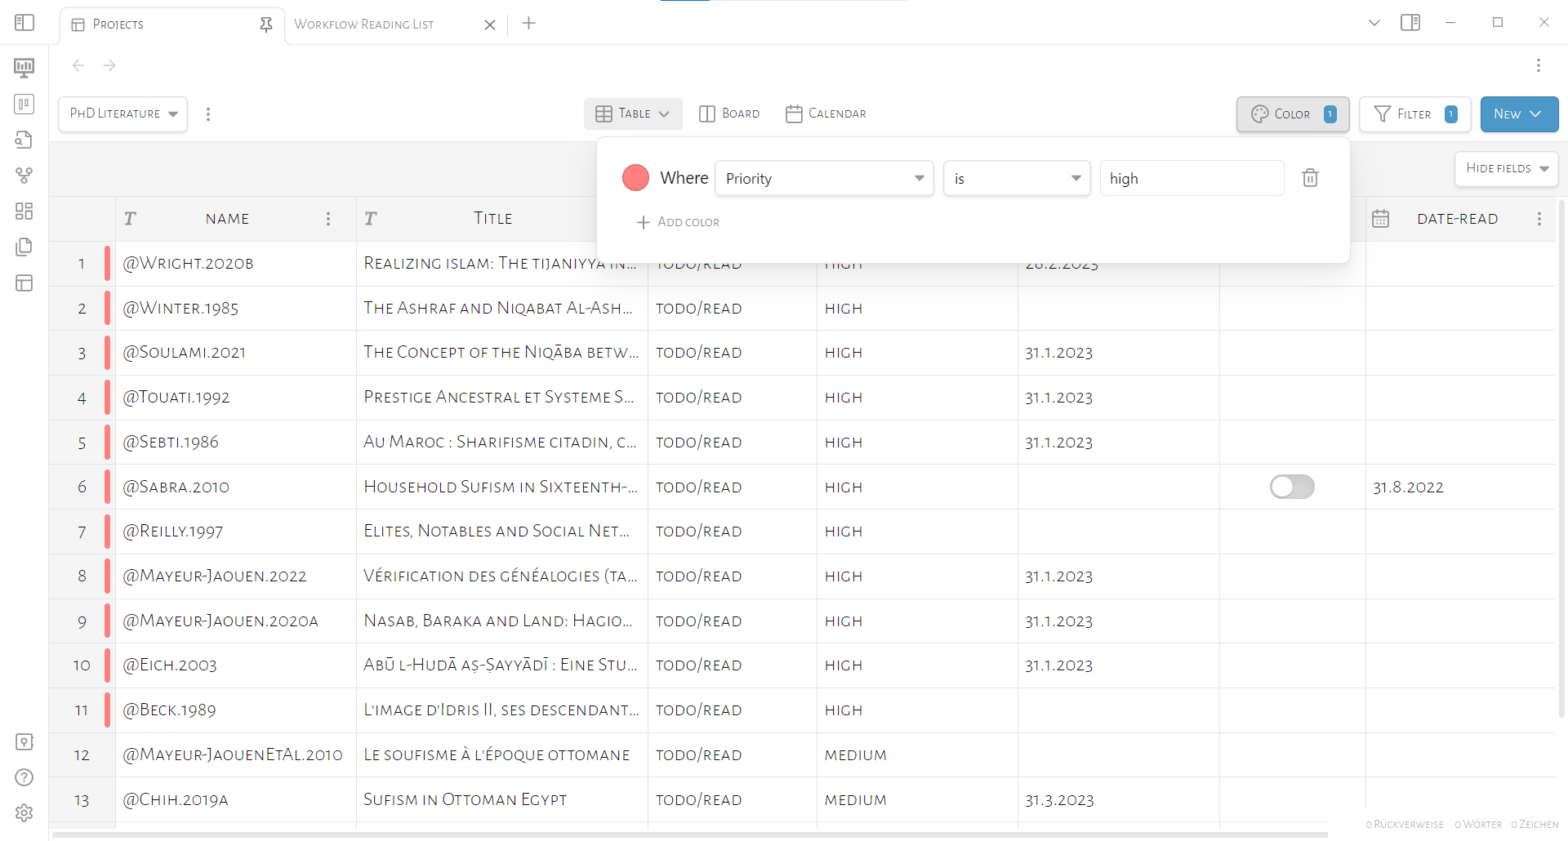
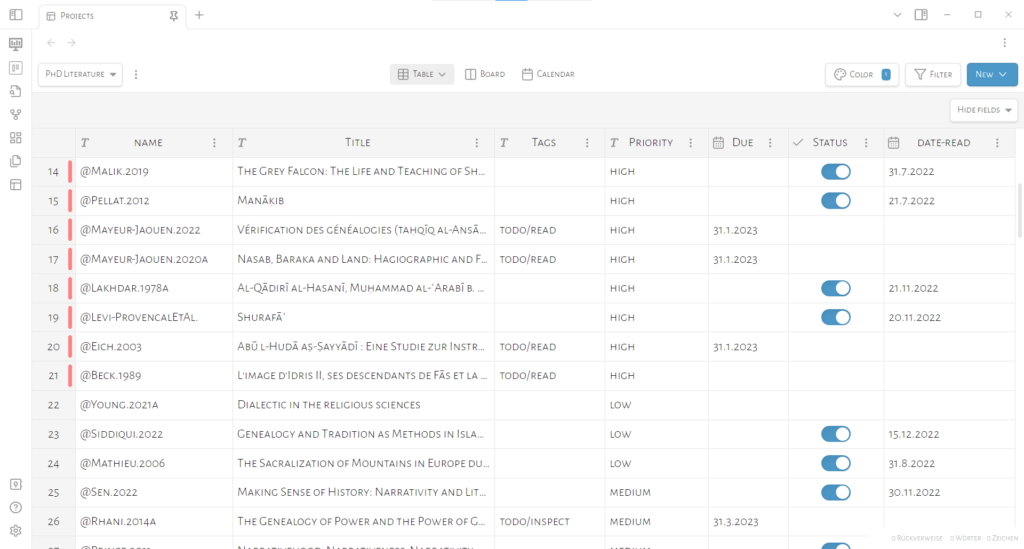
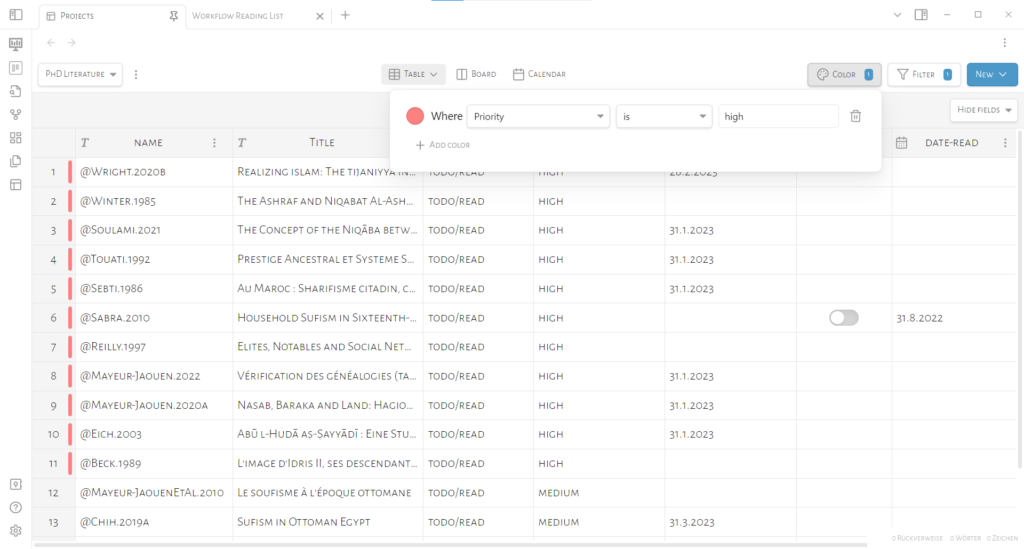
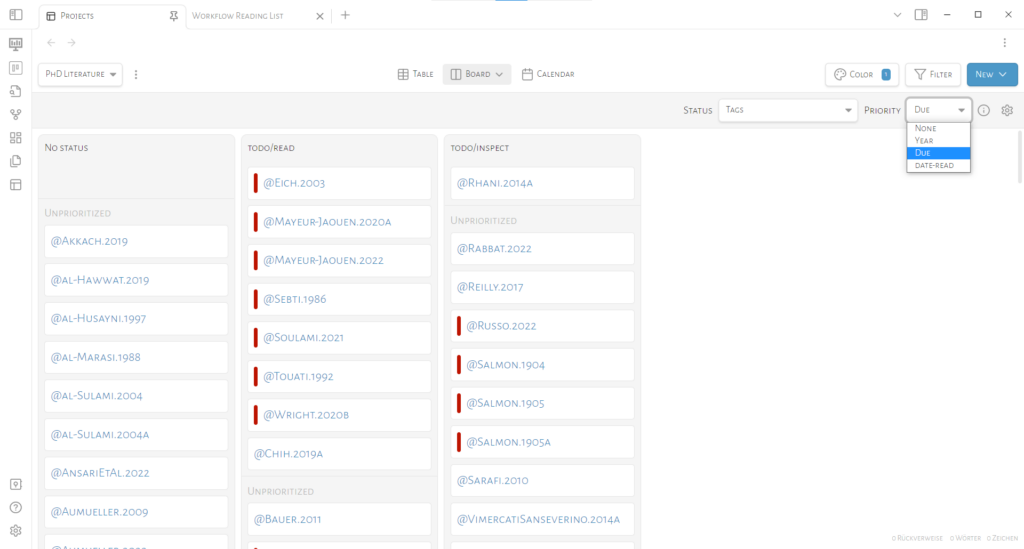
But there are already some interesting features I would like to point out here, e.g. that you can have individual items displayed in board or calendar view, you can filter the view, and highlight items by color.
Below are some examples from my own active Vault:

I hope I could be of some help with this. If you want me to explain anything in more detail, feel free to comment here or in the thread on Mastodon. Then I will gladly expand this post.
Schreibe einen Kommentar